Integrating Project Expo with Okta OpenID Login to iOS and Android

Share
As mobile applications become more popular and widespread, it's becoming increasingly important for developers to incorporate secure authentication methods into their apps. One such authentication method is OpenID, which allows users to log in to multiple websites and applications using a single set of credentials. In this article, we'll explore how to integrate Okta OpenID Login with a Project Expo mobile application for both iOS and Android platforms.
What is Okta?
Okta is a cloud-based identity management platform that provides secure authentication and authorization services for web and mobile applications. It allows developers to integrate various authentication methods, including username/password, social login, and multi-factor authentication. Okta provides a simple and secure way to manage user identity and access control, ensuring that only authorized users have access to sensitive information.
What is Project Expo?
Project Expo is a tool that allows developers to create and publish cross-platform mobile applications using React Native. It's an excellent choice for developers who want to build mobile apps quickly and efficiently, without the need to write separate code for each platform.
Integrating Okta OpenID Login with Project Expo
To integrate Okta OpenID Login with a Project Expo mobile application, we'll need to follow a few steps:
Step 1: Set up an Okta Account
The first step is to sign up for an Okta account. Go to the Okta website and click on the "Get Started for Free" button. Fill in the necessary details and create an account.
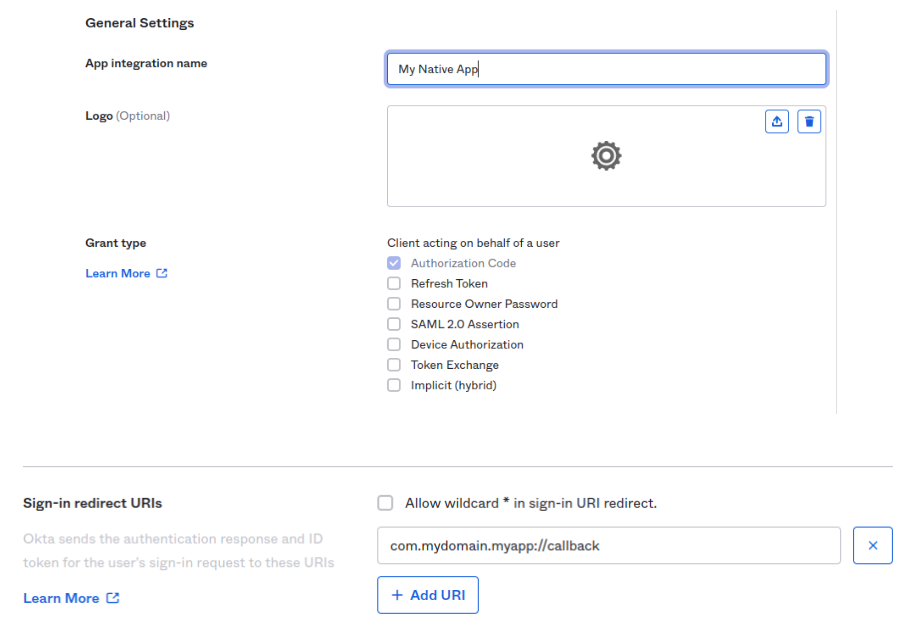
Once you've created an account, log in to the Okta Developer Dashboard. From there, click on "Applications" and then "Add Application." Choose "Native" as the application type and click "Next."
In the "General" tab, give your application a name and upload a logo if desired. In the "Sign-in redirect URIs" tab, type in your redirect url(this will be the same scheme we’ll use on expo configuration) "com.mydomain.myapp://callback" as the sign-in method, then click save.
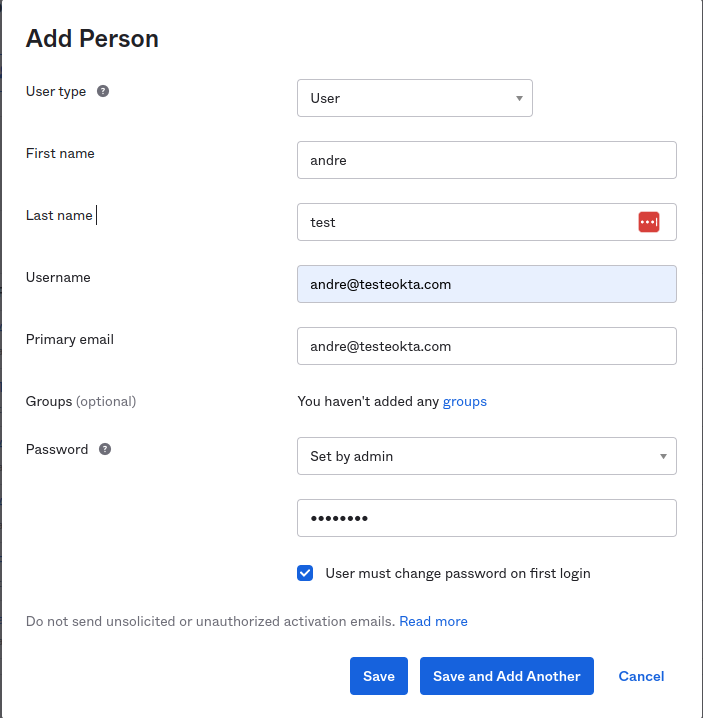
Step 1.1 Create a user in OKTA
On left pannel click on “Directory”, “People” then on the oppened click “Add Person”

Fill the text inpus in the Password select Set by admin write donw a password then save.
Step 2: Configure Okta in app.json
To configure Okta in Project Expo, we'll need to modify the app.json file. Here's how:
First, add the following lines to the "expo" object in app.json.
Replace "com.yourcompany.yourapp" with your own bundle identifier or package name.
Next, add the following lines to the "expo" object in app.json:
{
  "expo": {
    "name": "okta",
    "slug": "okta",
    "scheme": "com.yourcompany.yourapp",
    "version": "1.0.0",
    "orientation": "portrait",
    "icon": "./assets/icon.png",
    "userInterfaceStyle": "light",
    "splash": {
      "image": "./assets/splash.png",
      "resizeMode": "contain",
      "backgroundColor": "#ffffff"
    },
    "assetBundlePatterns": ["**/*"],
    "ios": {
      "supportsTablet": true
    },
    "android": {
      "adaptiveIcon": {
        "foregroundImage": "./assets/adaptive-icon.png",
        "backgroundColor": "#ffffff"
      },
      "package": "com.yourcompany.yourapp"
    },
    "web": {
      "favicon": "./assets/favicon.png"
    }
  }
}
These lines add the custom URL scheme and callback URL to your app.json file, which is required for Okta authentication.
These lines grant the necessary permissions for your app to access the internet and network state.
Step 3: Install Dependencies
To integrate Okta with your Project Expo application, you'll need to install a few dependencies. Open your terminal and navigate to your project directory. Then, run the following commands:
npx expo install expo-auth-session

npx expo install expo-web-browser

npm install axios
These dependencies are required for handling authentication.
Step 4: Implement Okta Authentication
Now that we've configured Okta in app.json and installed the necessary dependencies, we can implement Okta authentication in our Project Expo app. Here's how:
In App.js, lets import what we will use:
import { StyleSheet, Button, SafeAreaView } from "react-native";
import { useState } from "react";

import axios from "axios";

import * as AuthSession from "expo-auth-session";
import * as WebBrowser from "expo-web-browser";
Then add the following lines
//to ensure close login widget
WebBrowser.maybeCompleteAuthSession();

//connfiguration
const oktaConfig = {
  //ypur application id from okta
  clientId: "[your okta clientId]",
  //yout domain from okta
  domain: "https://[yout okta domain]",
  // yout domain + /oauth2/default
  issuerUrl: "https://[your okta domain]/oauth2/default",
  //callback configured in okta signin url
  callbackUrl: "com.yourcompany.yourapp://callback",
};
Now we configure our hooks to set the login enviroment.
  const [authState, setAuthState] = useState(null);

  const discovery = AuthSession.useAutoDiscovery(oktaConfig.issuerUrl);
  const redirectUri = AuthSession.makeRedirectUri({
    // For usage inbare and standalone
    path: "callback",
  });
Once you have made these changes, you should be able to run your app with Okta authentication enabled. When the user taps the "Login with Okta" button, the loginWithOkta function will be called, which will generate an authorization URL and open it in the Expo web browser using ptomptAsync. This will prompt the user to enter their Okta credentials and authorize your app to access their information.
After the user has authorized your app, they will be redirected to the redirectUri you specified. The AuthSession module will automatically handle the redirect and retrieve the authorization code from the URL. The code will then be exchanged for an access token and an ID token using the Okta API.
The access token can be used to make API requests to protected resources on the user's behalf, while the ID token contains information about the user, such as their email address and user ID.
With this implementation, your Expo app should now be able to authenticate users using Okta's OpenID Connect service. You can customize the UI of your login screen and handle errors as necessary to provide a smooth user experience.
Let's first take the autorization code
  const loginWithOkta = async () => {
    try {
      const request = new AuthSession.AuthRequest({
        clientId: oktaConfig.clientId,
        redirectUri: oktaConfig.callbackUrl,
        prompt: AuthSession.Prompt.SelectAccount,
        scopes: ["openid", "profile"],
        usePKCE: true,
        extraParams: {},
      });

      const result = await request.promptAsync(discovery);

      const code = JSON.parse(JSON.stringify(result)).params.code;
      setAuthState(result);
Now we can use the code to get the token and user information.
      const tokenRequestParams = {
        code,
        clientId: oktaConfig.clientId,
        redirectUri: redirectUri,
        extraParams: {
          code_verifier: String(request?.codeVerifier),
        },
      };
      const tokenResult = await AuthSession.exchangeCodeAsync(
        tokenRequestParams,
        discovery
      );

      const accessToken = tokenResult.accessToken;

      // make an HTTP direct call to the Okta User Info endpoint of our domain
      const usersRequest = `${oktaConfig.issuerUrl}/v1/userinfo`;
      const userPromise = await axios.get(usersRequest, {
        headers: {
          Authorization: `Bearer ${accessToken}`,
        },
      });

      console.log("\n\nUser data:", userPromise.data);
      console.log("\n\nOkta Token: ", accessToken);
    } catch (error) {
      console.log("Error:", error);
    }
  };
Then inside the return of the componnent we create a Button to call the function, and create a simple style to it.
 <SafeAreaView style={styles.container}>
      {authState ? (
        <Button title="Logout" onPress={() => setAuthState(null)} />
      ) : (
        <Button title="Login" onPress={loginWithOkta} />
      )}
 </SafeAreaView>
and apply some style at the end of the file.
const styles = StyleSheet.create({
  container: {
    flex: 1,
    backgroundColor: "#fff",
    alignItems: "center",
    justifyContent: "center",
  },
});
The full code of the component
import { StyleSheet, Button, SafeAreaView } from "react-native";
import { useState } from "react";

import axios from "axios";

import * as AuthSession from "expo-auth-session";
import * as WebBrowser from "expo-web-browser";

//to ensure close login widget
WebBrowser.maybeCompleteAuthSession();

//connfiguration
const oktaConfig = {
  //ypur application id from okta
  clientId: "[your okta clientID]",
  //yout domain from okta
  domain: "https://[your okta domain]",
  // yout domain + /oauth2/default
  issuerUrl: "https://[your okta domain]/oauth2/default",
  //callback configured in okta signin url
  callbackUrl: "com.yourcompany.yourapp://callback",
};

export default function App() {
  const [authState, setAuthState] = useState(null);

  const discovery = AuthSession.useAutoDiscovery(oktaConfig.issuerUrl);
  const redirectUri = AuthSession.makeRedirectUri({
    // For usage inbare and standalone
    path: "callback",
  });

  const loginWithOkta = async () => {
    try {
      const request = new AuthSession.AuthRequest({
        clientId: oktaConfig.clientId,
        redirectUri: oktaConfig.callbackUrl,
        prompt: AuthSession.Prompt.SelectAccount,
        scopes: ["openid", "profile"],
        usePKCE: true,
        extraParams: {},
      });

      const result = await request.promptAsync(discovery);

      const code = JSON.parse(JSON.stringify(result)).params.code;
      setAuthState(result);

      console.log(code);

      const tokenRequestParams = {
        code,
        clientId: oktaConfig.clientId,
        redirectUri: redirectUri,
        extraParams: {
          code_verifier: String(request?.codeVerifier),
        },
      };
      const tokenResult = await AuthSession.exchangeCodeAsync(
        tokenRequestParams,
        discovery
      );

      const accessToken = tokenResult.accessToken;

      // make an HTTP direct call to the Okta User Info endpoint of our domain
      const usersRequest = `${oktaConfig.issuerUrl}/v1/userinfo`;
      const userPromise = await axios.get(usersRequest, {
        headers: {
          Authorization: `Bearer ${accessToken}`,
        },
      });

      console.log("\n\nUser data:", userPromise.data);
      console.log("\n\nOkta Token: ", accessToken);
    } catch (error) {
      console.log("Error:", error);
    }
  };

  return (
    <SafeAreaView style={styles.container}>
      {authState ? (
        <Button title="Logout" onPress={() => setAuthState(null)} />
      ) : (
        <Button title="Login" onPress={loginWithOkta} />
      )}
    </SafeAreaView>
  );
}

const styles = StyleSheet.create({
  container: {
    flex: 1,
    backgroundColor: "#fff",
    alignItems: "center",
    justifyContent: "center",
  },
});
To run the project.
npx expo run:android     - for android
npx expo run:ios         - for ios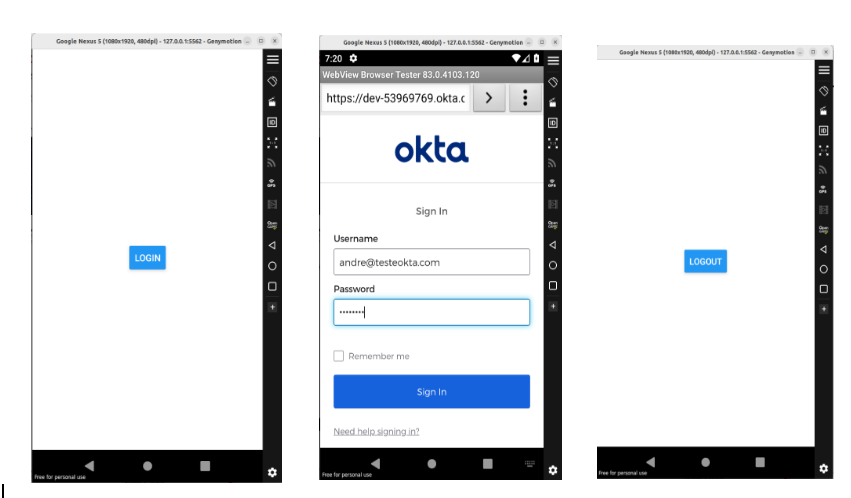
Tags
Mobile Development
.jpg)
.jpg)
Related Posts

Insights
Top 10 Advantages of Mobile Apps for Enterprises
In an era where technology shapes business landscapes, mobile apps emerge as game-changers, helping brands carve a niche in the digital sphere.


Insights
The Top Reasons Flutter Dominates in Mobile App
In today’s digital market, the right mobile app can be a game-changer for your business. But with so many technologies, choosing the best platform for your app is essential.
Subscribe to
Our Newsletter
Join 1,000+ people and receive our weekly insights, tips, and best practices.

Success!
Thank you for subscribing to Buzzvel's
Newsletter, you will now
receive amazing
tips and insights weekly.